3D-Printed Customized Assistive Device
The project was in collaboration with occupational therapy (OT) students at Boston University's Sargent College of Health and Rehabilitation Sciences. As part of their curriculum, students learn how they can use 3D printing technology to create custom printed parts to help their patients perform everyday tasks more easily. Each group, consisting of 4-5 OT students and one engineering student, was assigned a case study to develop products that the client requested. My group's case study was a 65-year-old patient with a right hemiparesis and on a wheelchair. Because he can only move his left hand, he has trouble taking pictures on his phone. He asked us to develop a product that would allow him to hold and press buttons on his phone at the same time.
First Iteration
The engineering drawing of our first iteration is shown below. It was modeled on SolidWorks. Due to shortage of time, the prototype was developed to illustrate the overall design rather than functionality. The C-shaped part is the attachment end that will mount the device onto the arm rest of the wheelchair. For our next iteration, we wanted to add more functionality to the prototype.

Second Iteration
The second iteration had four components to the device:
(1) Attachment end: anchors the entire product onto the wheelchair - specifically to the area where the joint stick is located.
(2) Rotating plate: connects the bar to the attachment end and allows the phone holder to swing out, if needed. A long screw and a hex nut is required to attach it to attachment end.
(3) Bar: gives height to the phone holder so that it is at a comfortable level for the user.
(4) Phone holder: keeps the phone in place.
The client was satisfied with the height and design of the device. However, he did request that he wanted to mount the device not on his armrest but on the joy stick. The engineering drawings are shown below:
Post-Processing
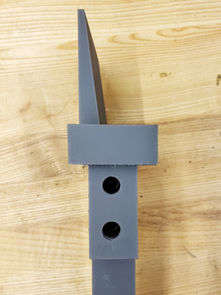
The attachment end has a circular cut to be able to mount around the joy stick. A Velcro will go through the rectangular holes to secure the attachment onto the wheelchair. Triangular cuts were made on the side of the rotating plate, so that extra space is provided for the person to properly tighten the hex nut (the size of the hex nut is roughly equal to the inner dimensions of the rotating plate). The components were printed on FormLabs Form 2 printer using Grey resin. However, there was a minor mishap on the printer and the dimensions of the phone holder was bigger. As a result, the sleeve did not properly fit into the bar as planned. Because there was insufficient time to reprint the part, it was decided to secure the phone holder and the bar with screw and bolts, as shown in the photos. A sketch of where the holes will be placed as well as detailed shots of the final print are shown.


